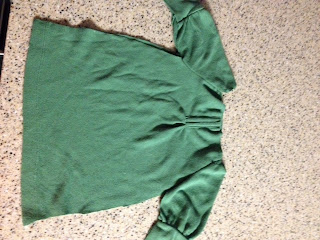
I came across this size medium Old Navy Shirt and and fell in love with the sleeves and mock slit down the front. I have seen several really cute upcycled projects on pinterest and thought I would try my hand at it. I was surprised at how quickly the plans for it came it along. I had this dress finished in about 45 minutes and that included my time sitting and thinking of what to do next. Most sweater to dress tutorials I have found use the existing neck for the upcycled dress. The neckline of this shirt was too large to do that, so I made ribbing to line the neck.
Before!
I placed a dress I knew fit my daughter and placed it over the shirt. Since I am using the shirt hem, I do not have to leave a seam allowance at the bottom. This shirt just did fit the length needed, so I cut across the arm seam of the shirt.
After cutting the top, I used the store bought dress to guide my armholes and tapper off the sides of the dress. As narrow as this shirt was I probably could have gotten away with only cutting out the armholes. I modeled the cutout after a peasant dress.
Next, I cut the sleeves off the dress on the outside of the existing seam. I then cut off the bottom part of the sleeves fit more snug. This step also makes the dress easier to work with when putting in the sleeves.
Sew the sleeves to both the front and back of the dress with right sides together. Repeat this step with the other sleeve.
Using the remaining fabric cut a strip the length of the shirt and about 2" wide. This strip is going to be used as your ribbing for the collar. Install ribbing around the neck of the dress. To do this you will fold the ribbing wrong sides together and sew the rough edges of the ribbing to the rough edges of the collar. You will stretch the ribbing as you go to help maintain body in the collar and give it some elasticity when putting the dress over the child's head.
The last step is to place the dress inside out and sew up the sides. Start at the sleeve and stitch around the armpits and down the the end of the dress. I used my serger to complete this step, but be careful around the sharp corners of the armpit.
In order to add some personal charm to the dress I added a flower at the top of the fake split in the shirt. To make the bow you will need a scrap of the shirt that is about 5" by 4." I folded the bow with right sides together and stitched around the rectangle leaving a small opening tin the center of the bow. Use this opening to turn the material right side out. Don't worry about sewing up the opening in the bow.
Once the bow is turned right side out i folded the left and right ends of the bow together in the middle. I used a zig zag stitch to hold the taps down in the center.
I used a needle and thread to accordion style fold the bow and hold in place. I cut a small portion of the ribbed cuffs and wrapped around the center of the bow sewing in place and then hand stitching to the front of the dress. This dress was super easy to assemble and looked so cute on top of some black tights. The lightweight material and the 3/4 sleeves allows this dress to be worn in both the summer and spring.


0 comments:
Post a Comment