Thursday, July 11, 2013

Watermelon Jelly

0 comments

Every year I put up jars and jars of blackberry jelly.  My husband could live off PB & J sandwiches and my kids think jelly sandwiches are a sugar gift from God.  We go through jars every year and I rely on two wild bushes of blackberries for my bounty.  I feel sort of rednickish (if that is a word) because the bushes have grown in the middle of a nice neat flower bed and I now refuse for anyone to treat my berries like a weed.  I am basically killing my flowers to allow the torny bushes a chance to blossom and grow.

While in the kitchen one day preparing to can a few batches of blackberry jelly my husband asked if I could make watermelon jelly.  We laughed that they would even be such a thing and then quickly turned to the internet.  The internet and Pinterest have everything so it has to be somewhere, right?  Within minutes we found several recipes for watermelon jelly and watermelon rind preserves.  Willing to try anything we got to work prepping for our watermelon jelly.


I found the recipe on a website called Pick Your Own.  They list various farms in different areas and tell you how to can or freeze your harvest.  They had a really good recipe for Watermelon Jelly that was super easy plus they give helpful information for those new to canning.

The recipe does call for 4 cups of chopped Watermelon which I found out later from a different recipe is equivalent to 2 cups of watermelon juice.  We are very blessed to live a little over an hour away from Watermelon country and can get a good sized watermelons for $3 at the Farmer's Market in Cordele, GA.  If you are better at haggling then I am, you could probably get it cheaper.  One Watermelon would probably do 5 or more batches of jelly.  At first I tried to only use the heart of the melon for my juice as to not lose the sweetness, but after tasting the jelly, it is plenty sweet and could probably use less sugar, but I hate messing with sugar amounts of a jelly recipe.


My adapted Recipe:
4 cups of cubed Watermelon or 2 cups of juice
3 1/2 cups of sugar
1 package of liquid pectin (I prefer Certo)

yields 2 pints


My husband absolutely spoils me.  After several years of dealing with blackberries and cheese cloth to get every seed out, he bought me a strainer to attach to my kitchen aid mixer.  (I know it is not meant for blackberries and that is a topic for another day.)  We were able to run the watermelon straight through the strainer and out came 2 cups of perfectly liquid watermelon juice in no time!  The seeds and heavy pulp came out another end into a bucket to be feed to the chickens.  


Mix your juice, sugar, and pectin on the stovetop for a LONG time.  It takes about 20-30 minutes to get the mixture up to boiling.  The hint with making the watermelon jelly is to get the temperature up to 220 degrees.  I learned the hard way that 115 degrees won't cut it.  I clipped a candy temperature to the side of the pot and continued to boil.  Once it reaches 220 degrees the mixture will start to bubble and foam up to the top of the pot.  It is important to use a large pot for this reason.  I let my mixture boil for about a minute at 220 degrees and then removed it from the heat.  


You can then place your jelly in your jars following a traditional canning method.  I processed the jars for ten minutes.  It did take about a week for the jelly to completely gel.  Most recipes take up to two weeks, so don't give up if you wake up the next day and the mixture is still liquid.  Liquid jelly really bothers me, even if it is the next day, so to fix this problem I doubled my recipe and added 3 packs of liquid pectin instead of 2.  It just did fit in my large pot pictured above. 

I'm curious what other types of jellies are to be made out there.  If you can think it, you can make it!  The whole family was pleasantly surprised by this recipe.  The best way to describe the taste is a watermelon Jolly Rancher!

Friday, June 28, 2013

Pinterest Maxi Dress

0 comments

Now that the summer is here I have had fun sewing into the wee hours of the night or morning rather.   Sewing for two little girls has been way more fun than I ever thought possible.  I  do want to sew more for my son, but it is hard to find him a matching outfit to go with the frills and ruffles and pink motif of the girls' dresses.  The one dress I wanted to accomplish this summer was the pink chevron maxi dress that I found on pinterest years ago. 


I get very frustrated with Pinterest.  It has tons of ideas and very few real tutorials or patterns.  The dress above was on pinterest as an actual link to the pattern that you can purchase.  The pattern is for sizes 2T to 10 years.  I needed a size 12m and 7, so I waited and found an almost identical pattern made by McCalls (M6736) for $1 at Hancock Fabrics.  The McCalls pattern started at a size 3, so I bit the bullet and created a pattern for the 12m dress!  I have created only a few of my own patterns and only one other pattern that I kept the template for.  (I might need to work on posting that one soon.)

Materials Needed for the 12-18 month Maxi Dress
1 3/4 yards of material
Bodice and Ruffle Pattern Pieces
Sewing Machine
Serger (Optional)

The first thing you need to do is prep your material by washing and drying it so that it doesn't shrink or pucker on you after it is completed.  Iron out any wrinkles and start cutting out your pieces. 

Cut the following pieces out of your material.

        • Bodice Pattern Piece (Cut 2)
        • Front Ruffle Pattern Piece (Cut 2)
        • Back Bodice- 12.5" by 3.75" rectangle (Cut 2)
        • Skirt - 22.5" by 8.5"rectangle (Cut 2)  
        • First Ruffle- length of fabric by 3" (Cut 2)
        • Middle Ruffle - length of fabric by 3.75" (Cut 2)
        • Bottom Ruffle - length of fabric by 6" (Cut 2)
        • Stay Skirt - 22.5" by 2.5" (Cut 2)
        • Straps - 2" by 18" rectangle (Cut 2)
Once you cut out the ruffle you will make a narrow hem around the long two shorter lengths and the longest edge.  There are two methods that you can use to do this.  The first is  you can sew a stay stitch around those three edges.  Then trim 1/8" to the stitching.  Fold a small seam around using the stay stitch as your guide.  The stay stitch gives the fabric some weight and acts as a guide.  In the picture below you can see the stay stitch. 


Another way of making a narrow hem is using a hem foot.  I found a very useful youtube video that shows you exactly how to use the foot.  This video made using my foot very easy!  I was able to whip out a narrow neat looking hem for the bodice ruffles in no time.  Here are a few pictures of what it looks like looped in the hem foot.


Stitching on top of the hem no looped to go through my seam.


Always keep your needle in the fabric.


The next thing you need to do is ruffle the un-hemmed edge.  I normally use my ruffler foot, but as small as this is I used a gathering or basting stitch to give me more control over the amount of fullness I got in the ruffles.  Attach the ruffles with the angled side in the center.  Be sure to attach the ruffle to the right side of the bodice with the right side of the ruffle facing up.  The ruffle should stop about 1.5" from the top of the shoulder seam.  You don't want to trap the ruffle in the shoulder seam.

Next, you will fold the strap pieces lengthwise on top of each other and stitch a seam around three of the sides leaving a small side open.  Trim and turn both straps right side out and iron.  Attach the unfinished edge of the strap to the should seam being sure not to catch the ruffle in your stitches.

Now you should have two complete bodices sewn together; one with a ruffle and one without. Pin them right sides together being sure the straps and ruffles are out of the way only stitching over unfinished edges. (I know I am horrible about taking pictures along the way, but here is a picture of my pinned bodice.  You can't see it, but the back piece is also pinned, so I will make a complete circle around when stitching the pieces together.)  Double check to be sure straps and ruffles were not caught.  If you made a mistake use the seam ripper and resew the area.  


Turn bodice pieces right side out and under stitch the lining as much as possible.  I could only get to the underarms and a small portion of the V.  Iron the bodice.

The next part is making the skirt of the dress.  Sew the main dress pieces together at the side seams.  If you want an finished look use a serger or use a french seam.  Stitch all ruffles pieces and stay skirt together.  You should now have a shirt, stay skirt, and three ruffles loops.  Hem one side of each ruffle loop.  Again, I used the hem foot to make this step so much easier.

I like to use my ruffler foot.  I have a Bernina brand ruffler foot for my machine and when it is set on a six it ruffles the material down to about half the original size.  I created each ruffle to be equal to half the size of what it is being attached to, so you should be able to ruffle without thinking.  If you don't have a ruffler you will have to use a basting or gathering stitch.  Many people complain about breaking the thread while pulling the gathers.  One way to fix this problem is to run short distances and run two gathering threads side by side.  Running two threads may seem time consuming, but your ruffles will look much better when they are attached.  Also be sure your machine is set for the longest stitch possible.


Ruffle the skirt and attach to bodice front (not lining).  Ruffle the top ruffle (3" ruffle) and attach to the skirt. Attach stay skirt to the bottom of the skirt sandwiching the top ruffle in the middle.  Gather and stay the middle ruffle and bottom ruffle together letting the bottom ruffle hang below the middle ruffle and facing out.  (I hope this makes sense.)  I ruffled the two ruffles together through my machine so that they didn't come apart, but if you look at the picture the ruffles sort of sink into each other since they have the same tucks.  I would suggest running them through separate and then attaching them.  Attach both ruffle edges to the bottom of the stay skirt.

On the back bodice piece you will now have to gather the top so that it will want to stay on the child's back.  Sew a stitch 3/8" from the top edge of the back from underarm seam to underarm seam.  From the inside of the bodice run a piece of elastic through to the other end stitching it closed.  I am not the best at measuring elastic, but I always pull the elastic tight enough that when stretched all the way out the elastic still has some give.  

The last and final step is to the use a blind stitch to sew the bodice lining closed at the waistline seam.  

My girls love this dress.  They love the length and the ruffles.  Even the baby lit up when she put on the dress and immediately wanted to twirl and spin around the room.  Something about pink, ruffles, and little girls!  

Part of why I sew is to make adorable clothes for my kids and save money at the same time.  Of course I love being in my zone and stitching away, but I love saving money too.  These two dresses cost about $25 or $12.50 each.  The same dress is listed on zulily for $68 retail, but on sale for $40.  I think I did pretty good price wise then!


Tuesday, June 4, 2013

Crisping Wilted Spinach

0 comments


Every summer I try to experiment by planting something new and different in my garden.  Sometimes it flops and sometimes it is a huge success.  This year I added green beans and spinach.  So far I have been impressed with the spinach.  We have salads with just about every meal.  Our youngest loves lettuce, so this a more nutritious alternative.

The biggest dilemma I had was when I picked the spinach it looked so nice and crisp, but by the time it was washed and ready to put it away it was wilted and soggy.  I was so depressed so of course doing what I do best, I turned to the internet for answers.  

Their answer was soaking it for at least 20 minutes in a bowl of water.  I even tried this with some wilted lettuce I had in the fridge.  Low and behold, IT WORKED!!!!  No more throwing away wilted lettuce of spinach!  Just soak it in water and the hydration returns to the leaf.  Twenty minutes is just a guideline.  I soaked one batch of spinach overnight and it looked the same as soaking it twenty minutes.  


Saturday, May 18, 2013

Knit Picky

0 comments

I have fallen in love with sewing with knits!  I can't seem to get enough of knits.  This afternoon I went to JoAnn's and could not leave without at least one knit in hand!  With a grandmother and mom who were avid sewers/quilters I can't tell you what age I learned to sew. I always remember having a needle in my hand, but I really began to perfect the art of sewing after my first daughter was born seven years ago.  

I remember finding some adorable knit material on sale at Wal-Mart for $1 a yard and probably bought 5 yards.  I cut out my pattern and started to piece it together, but the material stretched all over the place.  I was frustrated and remember wanting to swear at the machine and threw everything away.  Luckily I kept the uncut knit.  As I was cleaning out material (Yes, I have to admit that I am a fabric hoarder!) I found the knit. I knew exactly what I wanted to make.  One of my first pins on Pinterst was a Razor Back Knit Dress, by Crafter Hours, which is perfect because I was definitely crafting after hours on this one!  I was so excited because the blog includes a tutorial and a PDF version of the pattern for sized 12 months to 8 years.  I made both girls the dress and they love them.  It is lightweight and so comfortable.  I am almost tempted to make several and use them as nightgowns or bathing suit cover-ups.  

I learned a lot while sewing these dresses together and thought I would share my journey along with a few tips that I have learned from sewing with knits.    

Since the pattern is a free PDF download, you have to print the pattern and cut out the pieces and tape them together.  This seems like a hassle, but each piece was marked and lined up perfectly.  I used double-sided tape to make the process go quicker.  I printed two copies of the pattern so that I didn't have to try to cut around the other sizes to get the 12-18 month size. (Something I do with a regular pattern printed on tracing paper.)


When pinning the paper on the knit everything kept sliding.  I was beginning to get frustrated again and had flashbacks of the last time I attempted knit.   To prevent everything from stretching out before I even began I placed my pins in the material against the stretch of the material.  That way my needle didn't keep pulling the knit.


Of course I had to monogram the girls' initials on the dresses.  I hate to hoop knit material because it leaves the burn marks where the hoop sat.  Instead I place pins all the way around the design.  I start with one  on the top and bottom, then left and right and then place the corners.  This keeps it from slipping off center and me not realizing until the last minute.  When embroidering knits be sure to use a good stabilizer.  I like to use a mesh or thick cut away.  Never use a tear away!  The knit is just not stable enough to handle it.


To keep the knit from stretching while sewing on the machine you can use a walking foot.  My Bernina has a built in walking foot that straddles the regular foot to help the material move on both sides.  I could really tell a difference with the walking foot engaged.  If you don't have a walking foot, or it is a hassle to use,  you can lift the pressure of your foot.  Most machines are set to a default setting that is too snug for knit and it doesn't allow the material to glide through like cotton does.  Check the setting.  I love my Bernina 830 because it has an auto adjustable foot and it releases the material if it senses too much pressure. 


It also helps if you have a knit stitch on your machine.  My machine has a crazy looking zigzag that allows the thread to stretch with the knit.  Some machines have what is called a jersey stitch that does the same thing.


If you don't have a jersey stitch, you are in luck!  You can easily set a zigzag stitch to allow for stretch.  I set my width at 2.0 and my length at 2.6.  I think I liked this just as much, if not better, than the stretch stitch.  The jersey stitch was tighter than I liked and it seemed to pull the material too much through the machine, but it wasn't noticeable in the end product. (I think it is supposed to do this, but I felt like I was messing up the dress while stitching.)  

You can also use a serger to sew knits.  I really liked using the machine for this project.  I always feel like I have more control on my machine versus my serger.  The seam also looked a lot less irritable on the machine than having the looped thread from the serger.  After attaching the ribbing I trimmed all seams to an eighth of an inch. 


Another part I dread about knits is applying the ribbing.  The walking foot made this step so much easier.  Once I tacked on the ribbing with the first few stitches I was able to stretch the material out as I sewed.  Be sure to keep the dress material from stretching, you only want the ribbing to have a slight stretch to it.  Don't pull it too hard. 


I did add an additional ruffle on to the bottom of the skirt.  I just sewed about 2x the length of bottom of the dress together.  I made the ruffle about 1.5" wide.  Since knit does not fray this ruffle was fairly easy.  I ran a gathering stitch down the center of the strip and gathered it up.


I pinned it on to the hem of the dress.  It really helps if you use LOTS of pins.  I place them about 2-3" apart.  I am the type that likes to skip steps along the way to help hurry the dress along.  This is a step that you do not want to skip!!!  I also skipped actually turning under the hem on the larger dress and that was a big mistake.  I am going to have to remove the ruffle and make a hem and place the ruffle back.  The ruffle apparently needs something stable to sit against.  Since I trimmed the underside after attaching the trim, the trim just folded on itself.  This might be too confusing to put into words, but bottom line, it looked bad!  The smaller dress I did I actually hemmed the dress according to the directions and then added the ruffle.  The bottom of the ruffle went just a hair past the hem of the dress. 


Wednesday, May 8, 2013

Upcycled T-shirt Dress

0 comments

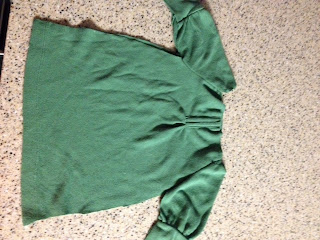
I came across this size medium Old Navy Shirt and and fell in love with the sleeves and mock slit down the front.  I have seen several really cute upcycled projects on pinterest and thought I would try my hand at it.  I was surprised at how quickly the plans for it came it along.  I had this dress finished in about 45 minutes and that included my time sitting and thinking of what to do next. Most sweater to dress tutorials I have found use the existing neck for the upcycled dress.  The neckline of this shirt was too large to do that, so I made ribbing to line the neck.


Before!


I placed a dress I knew fit my daughter and placed it over the shirt.  Since I am using the shirt hem, I do not have to leave a seam allowance at the bottom.  This shirt just did fit the length needed, so I cut across the arm seam of the shirt.


After cutting the top, I used the store bought dress to guide my armholes and tapper off the sides of the dress.  As narrow as this shirt was I probably could have gotten away with only cutting out the armholes.  I modeled the cutout after a peasant dress.  


Next, I cut the sleeves off the dress on the outside of the existing seam.  I then cut off the bottom part of the sleeves fit more snug.  This step also makes the dress easier to work with when putting in the sleeves.


Sew the sleeves to both the front and back of the dress with right sides together.  Repeat this step with the other sleeve.


Using the remaining fabric cut a strip the length of the shirt and about 2" wide.  This strip is going to be used as your ribbing for the collar.  Install ribbing around the neck of the dress.  To do this you will fold the ribbing wrong sides together and sew the rough edges of the ribbing to the rough edges of the collar.  You will stretch the ribbing as you go to help maintain body in the collar and give it some elasticity when putting the dress over the child's head.

The last step is to place the dress inside out and sew up the sides.  Start at the sleeve and stitch around the armpits and down the the end of the dress.  I used my serger to complete this step, but be careful around the sharp corners of the armpit.

In order to add some personal charm to the dress I added a flower at the top of the fake split in the shirt. To make the bow you will need a scrap of the shirt that is about 5" by 4."  I folded the bow with right sides together and stitched around the rectangle leaving a small opening tin the center of the bow.  Use this opening to turn the material right side out.  Don't worry about sewing up the opening in the bow.

Once the bow is turned right side out i folded the left and right ends of the bow together in the middle.  I used a zig zag stitch to hold the taps down in the center. 


I used a needle and thread to accordion style fold the bow and hold in place.  I cut a small portion of the ribbed cuffs and wrapped around the center of the bow sewing in place and then hand stitching to the front of the dress.   This dress was super easy to assemble and looked so cute on top of some black tights.  The lightweight material and the 3/4 sleeves allows this dress to be worn in both the summer and spring.   


Wednesday, May 1, 2013

Strawberries or Watermelon?

0 comments

I bought this material a year ago and wanted to make a watermelon themed dress for my two girls.  I washed the fabric with all intentions of whipping out two dresses, but a year later I found it still sitting on my shelf.  To make it easy I just dressed up a basic pillow case dress pattern.  I found the armhole pattern somewhere on Pinterest last year. I wish I could remember where I printed it from and I would link it.  Now that it is finished though I can't decide, watermelon or strawberry?


For the 12 month pattern I used a third of the width of fabric for the width of the dress cutting out the armholes according to the pattern (basically a 4" long "J" shape), and half of the width of fabric for the size 6/7 dress and a 5" armhole.  After cutting out the material I serged the two side seams.


Next, iron the armhole raw edges under twice.  I tried to make this very narrow1/4" hem.) Sew the edges down.


Next iron/sew the elastic casing.  I normally use 3/4" elastic, so just be sure the elastic has plenty of room to seat flat in the casing.


Cut out the straps and front flat.  I made the front flap the width of the casing and about 5" tall.  The straps I cut about 13" long and 2.25" wide.  Fold each strap in half lengthwise and sew down the side seam.  Fold the front flap in half lengthwise, but leave a 1' opening on the top center of the strip.  Sew on all three sides leaving the center open.


Flip strapes and front flap right side out and iron.  Use a poker or blunt side of a pair of scissors to put out the seams.  Make sure the seam on the straps is running down the center back of the straps.  

To add the front flap I pinned the rectangle with the opening towards the dress.  I placed the flap on top of the casing and pinned in place.  I pulled back the flap in the picture to show you how slight the overlap is.


To thread the elastic you will need a safety pin and plenty of elastic.  The straps and front and back casing are filled with elastic.  I have made pillow case dresses by using ribbon and have found that elastic holds better than the ribbon and keeps the shape of the outfit. 


I don't like to cut elastic to a certain length when sewing.  I buy my elastic in bulk and don't like to leave extra throw away pieces.  To avoid this I threaded the elastic through a strap, the front casing, a strap and then the back casing.  It makes a circle of elastic.  Then I start on the back casing and pin the end of the elastic to the end to keep it from coming loose.  Work with the opposite end of the casing and wrap the strap around the elastic and sew it stationary.  Then allow the elastic to spring back in the casing.  Push it in if needed  Once the strap ends are no longer showing sew down the casing securing the strap in the casing.  I followed my armhole stitching to make it look neat and put together. I continued this method around the dress.   
Once I was back to where I started, I unhooked the safety pin and pulled the elastic out of the casing enough to sew it to the strap elastic.  Trim any elastic past the seam to avoid bulkiness.  To finish I pushed this seam back into the casing and secured with a straight stitch just like the others.


To finish the top I did a blind stitch shown below to attach the front flap to the armhole seams. 


To finish the dress I used my ruffler to make a pleated ruffle to go around the bottom of the 12 month dress and a solid green stripe to sew around the bottom of the 6/7 dress.


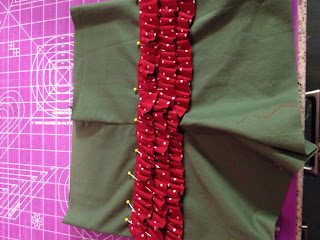
I was hoping that the 12month top would be more shirt length than dress length so you could see the cute bloomers I made to go with the outfit.  I just attached three layers of pleated material on the rear making them barely overlap.


I had some extra material left over and really want to make the girls a doll dress using the Oliver + S popover doll pattern.  I used the pattern for a birthday top for a friend's daughter and fell in love with the pattern!  Can't wait to post a picture of both girls with their matching doll dresses.


All Ruffled Up Copyright © 2012 Design by Ipietoon Blogger Template